After Effects Shortcuts: A Practical Cheat Sheet (Mac/Windows)
Using Adobe After Effects keyboard shortcuts is really a good idea. This can help speed up your workflow while dealing with the complex actions. Besides, just using the mouse causes attention breaks and takes away a lot of time. Shortcuts significantly accelerate AE processes because you don't waste time searching for commands. Also, when working on a high-detail project with multiple layers, shortcuts help you manipulate elements more easily.
How to Read Shortcuts
On Windows, you can use Ctrl like a Command key on Mac, and Alt just like an Option key on Mac. Timeline, Composition, and Project would treat these keys differently because they are distinct processes, meaning their operations are at different levels of organization and control.
To find out if a certain After Effects shortcut works, use the Keyboard Shortcuts Visualizer (Ctrl+Alt+Key or Cmd+Option+Key). It will show all the available shortcuts. Then use them on your keyboard to see the changes to your composition and timeline.
The Shortcuts You’ll Use Every Minute
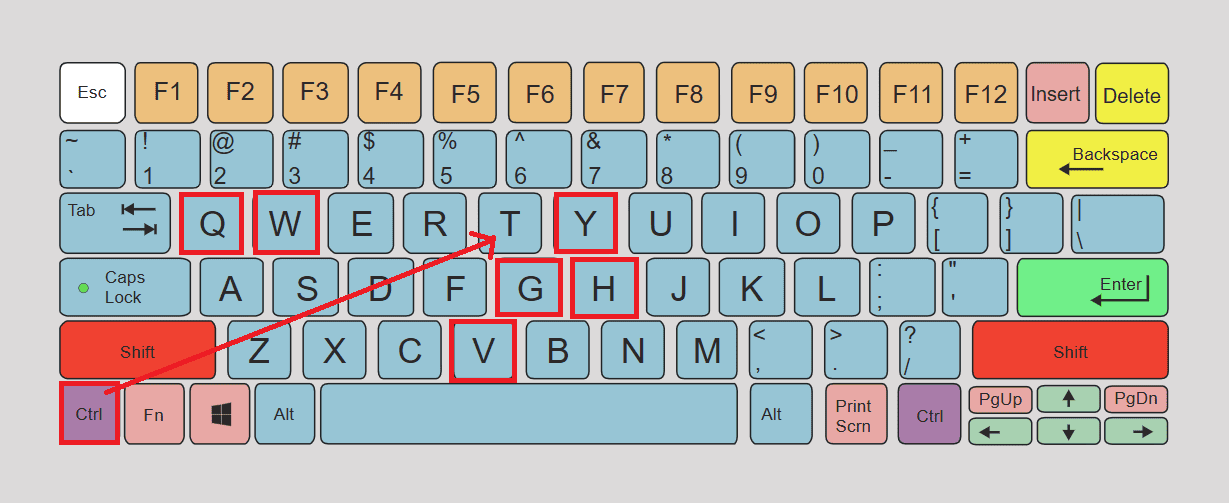
Tools: V (Selection) - allows you to select, move, and transform layers in a composition; H – use it to move the view in the composition, layer, and footage space; G - ideal for drawing masks and paths, but also for precisely shaping lines and curves; Q - cycles between shapes such as rectangles, ellipses, and others when creating shape layers and masks; Y – moves a layer's anchor point without changing its position in the frame, which is very useful for accurately animating rotation or scaling; W - use it to manually rotate in 2D or 3D space, C - controls the angle and position of the camera in 3D compositions, Ctrl/Cmd+T – initiates the tool for entering and editing text in the composition.
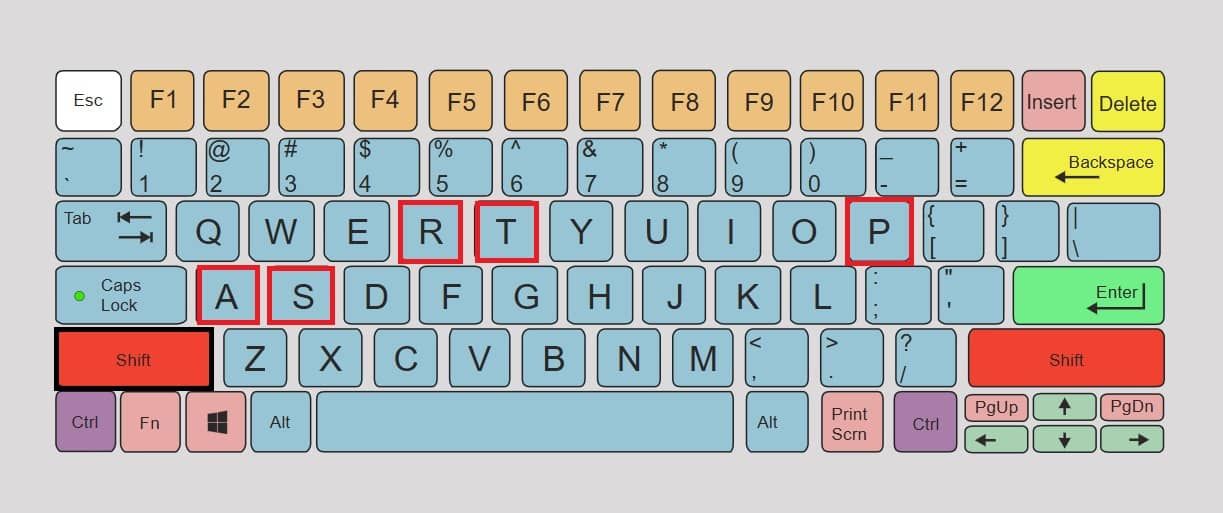
Transforms: P - shows and modifies the place of the selected object; S - makes the object smaller or larger; R - rotates the layer around a centre point; T - manages transparency from full visibility (100%) to invisibility (0%); A - shows changes to the point around which the object rotates and scales. Pressing Shift and any combination of these will show more properties in the timeline. Example: P, Shift S to check position and scaling.
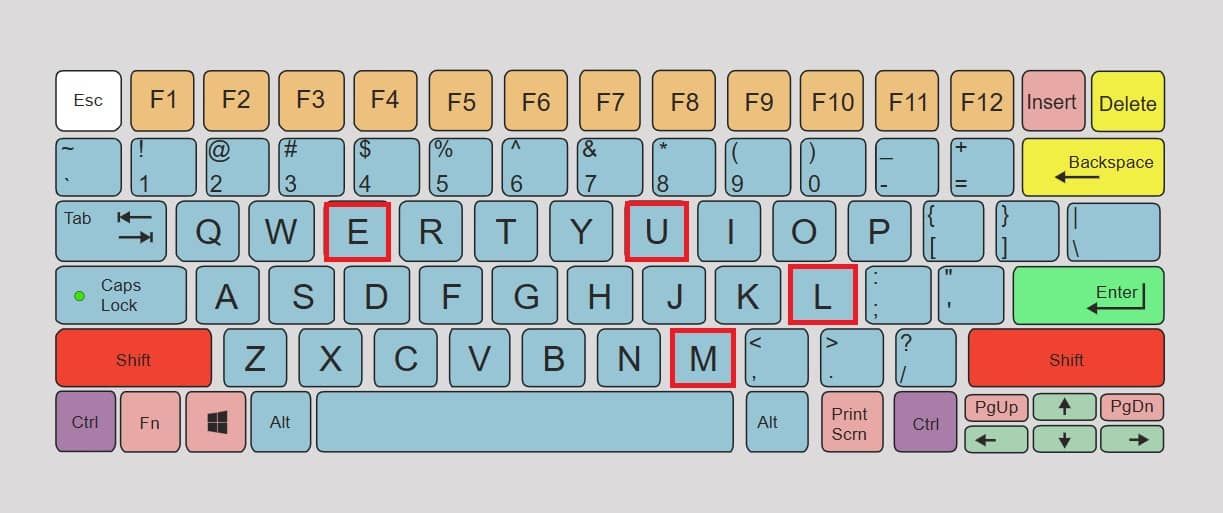
Reveal and search: U – shows only those parameters on the layer that have keyframes, UU – double-clicking on U will show you all the changed parameters - blending, effects, and masks; E – list of effects applied to the layer; EE – double E shows all expressions added to the layer parameters; M – for the mask path on the layer; MM – double-click on M to see all the mask properties - path, feather, opacity, and expansion; L – for sound level, i.e. loudness; LL – double-click on L to open the waveform. This will make it easier to synchronize the image and sound.
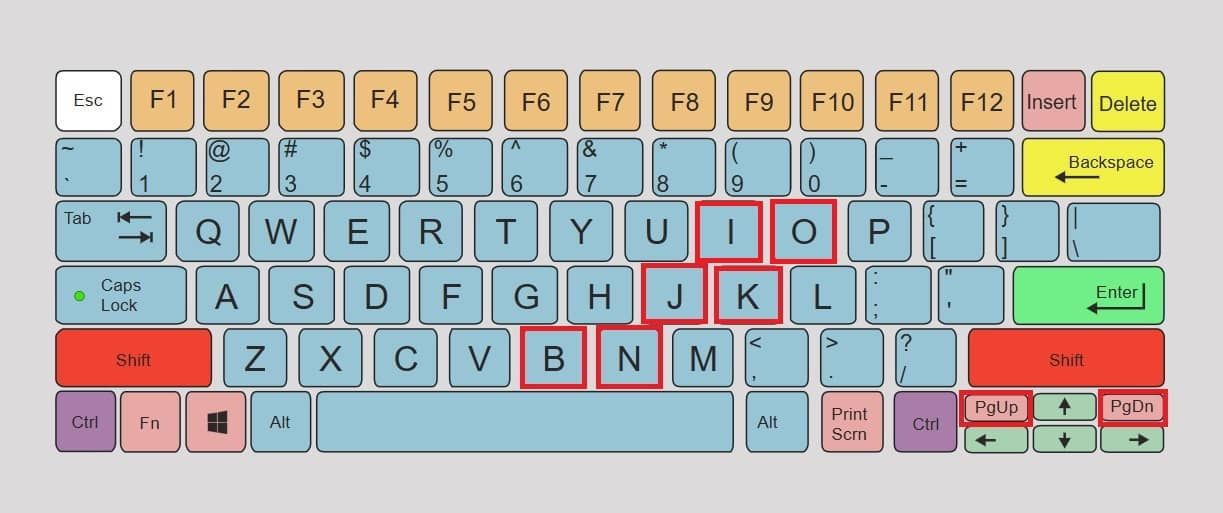
Navigation: J/K open the previous/next keyframes or layer markers for easy jumping in animations in the timeline; Page Up/Down - move the pointer forward or backward by one frame; Shift+Page Up/Down - shift the current time indicator 10 frames forward or backward. Home/End allows you to move the time indicator to the start or to the very end of the composition; I/O - transfer the time indicator to the start (in) or the end (out) of the selected layer; you can easily review and adjust the duration of the layer. B/N – fix the Beginning and End of the work area in the timeline. It’s useful for rendering and previewing part of a composition.
Layer edits: Alt/Option+[ and Alt/Option+] - the left and right edges of the layer move at the position of the time indicator. This allows you to precisely cut or lengthen the layer; Ctrl/Cmd+Shift+D – splits the layer into two parts at the current time indicator position. This way, both halves can be processed individually; Ctrl/Cmd+D – the fastest way to duplicate a selected layer; Ctrl/Cmd+Shift+C – groups multiple layers into a new composition, keeping them in the major one. This helps organize and apply effects to multiple layers at once.
Preview: Spacebar – starts and stops playback of a composition in the timeline, Numpad 0 - allows a smooth view of effects and animations because it plays the animation at full framerate using RAM, Numpad . - plays only the audio from the composition, without showing the video.
Markers: Use the Numpad * key to add a marker to the current frame in the timeline or layer. This way you can mark important points in your composition.
Render: Ctrl/Cmd+M – adds the current composition to the render queue, ready for export.
View: +/− - Zooms in/zooms out in the view panel. This makes it easier to check details; Shift+/ - adjusts the display to Fit to View. So, the entire composition is visible within the panel; ` (backtick/ tilda taster) - maximizes the currently active panel; F4 – toggles between the Switches and Modes columns in the timeline. This gives you easier access to layer options and blend modes.
Additional tip #1:
We said that shortcuts help you save time. Nexrender does the same because it optimizes and speeds up automated video generation.
Timeline Navigation After Effects Hotkeys
Exact-frame moves: Page Up/Down - Move one frame up or down within a time frame indicator; Shift+Page Up/Down - move the current frame 10 frames up or down.
Intelligence Jump: J/K - Move to the preceding or succeeding key frame or marker; I/O - send current time to the beginning (in) or end (out) of the selected layer; Home/End - move to the beginning or end of the composition; B/N - set the start (B) and end (N) of the work area.
In/out points - Set in/out points for a layer and work area in less than 5 seconds.
Transform and Align Faster
Practical in real workflows, After Effects shortcut keys like P, S, R, T, and A have purpose in adjusting the Position, Scale, Rotation, Opacity, and Anchor Point of an object in animation.
Through a temporary tool, you can change the function of a tool while pressing a key. For example: while you hold down the Shift, you can move an object, and its movement is confined to straight lines. Pressing the Shift can also activate or enhance snapping – the alignment of an object to edges, grids, and other elements in the composition.
Trimming, Splitting, and Moving Layers in Time
Alt+[ for Windows and Option+[ for Mac (Alt/Option+]) are for precise cutting of layers. The first one sets the beginning of the layer, while the second sets the end of the layer to the current frame.
Apply Ctrl/Cmd+Shift+D to split a layer exactly at the current frame. This will quickly make two copies of the same layer. Press Shift+Alt/Option+Page Up/Down to move the layer at larger intervals (seconds).
After Effects Keyframe Shortcuts and Easing
Button F9 applies ease between keyframes for more natural motion. Shift+F9 creates ease at the beginning of animation. Ctrl/Cmd+Shift+F9 creates an ease at the end of the animation, like an entry and exit in controlled motion.
Use J and K to navigate keyframes and U to reveal them. Graph Editor toggle allows turning Graph Editor on or off to fine-tune interpolations. It is recommended to assign your own if unassigned.
Masks and Shape Layers Shortcuts
Press Q to cycle shape tools, G for the Pen tool for creating and editing masks and paths, and MM to reveal all Mask properties.
For example: Press G to choose and draw the mask, then MM to display all mask properties. Adjust the Mask Feather using the arrows or by directly entering the value.
Text and Typography Shortcuts
Ctrl/Cmd+T activates the Type tool for quick text input; V is for exiting text editing and selecting text layers cleanly.
Preview, Audio, and Caching Shortcuts
The spacebar starts and stops the basic preview, while Numpad 0 activates the RAM Preview. We recommend that you configure the preview panel for optimal audio synchronization. You can do this by opening Window>Preview, and then setting options such as: Resolution/Skip - reduce resolution for faster playback, Range - whether the entire composition, work area, or selected layers are played, Audio - turn sound on or off during preview, Cache Before Playback - allows RAM Preview to be loaded in advance for smoother display.
Use Numpad . for audio-only preview and LL to see the waveform of the audio layer. It’s great that Caps Lock disables viewer updates during heavy renders/RAM previews, which allows After Effects to spend all its resources on rendering rather than displaying the image.
Additional tip #2:
Shortcuts speed up work, but Nexrender increases control - create and edit videos in After Effects remotely, render projects in parallel, and automate your workflow.
Viewport, Zoom, and Panel Management
Buttons +/− zoom display in Viewer, Shift+/ automatically adjusts the display so that the entire composition fits in the viewer, and ` (grave) maximizes the panel under the cursor, enabling work in the full window of only that panel. F4 toggles Switches/Modes in Timeline for Motion Blur, 3D, Track Mattes and similar options.
3D Layers, Camera, and Nulls
W - use to manually rotate layers in a composition; C - allows you to move and rotate the virtual camera from different perspectives; R - displays layer rotation parameters in the timeline for fine-tuning; A - detects the point around which the layer is rotated or scaled, which is crucial for precise positioning. Ctrl/Cmd+Alt/Option+Shift+Y creates a new Null Object, often used for controlling or parenting other layers, including the camera.
Markers and Syncing to Audio
Numpad * sets markers in real time during playback. J/K are used to quickly move between markers, and marker commenting is used to organize work and create rhythmic marker-based animation within a layer or composition.
Use markers Numpad * to mark beats in the music and place keyframes at those points so the animation follows the beat.
Pre-compose, Replace Footage, and Parenting Essentials
Ctrl/Cmd+Shift+C opens the Pre-compose option, which groups layers into a new composition (what settings to choose). Alt/Option-drag allows you to replace the layer source with a new file while retaining all existing transformations and animations. Pick whip is the parenting tool that links layers so that one acts as a “parent” to another, which speeds up the rigging process.
Use this technique when you want to replace a placeholder clip with the final footage, without losing animation or position.
Render and Export Shortcuts
Ctrl/Cmd+M adds the composition to the Render queue, where you can quickly check and change output settings before rendering. Caps Lock temporarily turns off the viewer during rendering, but avoid using it if you need to monitor the visual results. This approach is great for quick render submissions because within a minute, you can add a composition, check settings, and start the final render.