How to Export After Effects to MP4
There is no ‘export MP4’ button in After Effects, but the good news is that you can do it in two ways. The first technique is simpler and involves exporting the video directly from After Effects. This method is most often used by beginners and those who create short and simple projects. But, how to export After Effects to MP4 in another way? The answer is Adobe Media Encoder. This program is used only to export and compress video. After Effects sends the project, and the Media Encoder creates the MP4.
Method A: Export MP4 with the Render Queue (no Media Encoder)
1. Render
Select the composition you want to export: Project/Timeline > Composition > Render Queue > Output Modules > Format > H.264 > Profile > High > Level > Based on resolution and frame rate > OK. How to save After Effects as MP4? Choose where the file will be saved by clicking Output to. Select a folder on your computer. Finally, click the Render button to start the export.
Professional tip:
With Nexrender, quickly and easily export MP4 videos from After Effects. The tool can work with any AE template and generate hundreds of videos without manual rendering.
2. Format
When you choose H.264, After Effects will create an MP4. This format is the most common and compatible for YouTube and social networks. High profile gives better image quality, and the good news is that most cell phones, computers, and platforms support this profile. As for the level settings, just set them based on your resolution and frame rate. After Effects takes it from there, picking the right level for your video. That way, you avoid annoying playback issues.
3. Bitrate Settings
Bitrate Settings determine video quality and file size. Project/Timeline > Composition > Render Queue > Output Modules > Bitrate Settings > Bitrate Encoding > VBR 1-pass/VBR 2-pass. VBR 1-pass allows for fast video export in a single pass. If you choose VBR 2-pass, the program first analyzes the entire video, then creates the final file. Under Bitrate Encoding you will find two fields: Target Bitrate - set to an optimal 10 Mbps; and Maximum Bitrate - set to an optimal 18 Mbps.
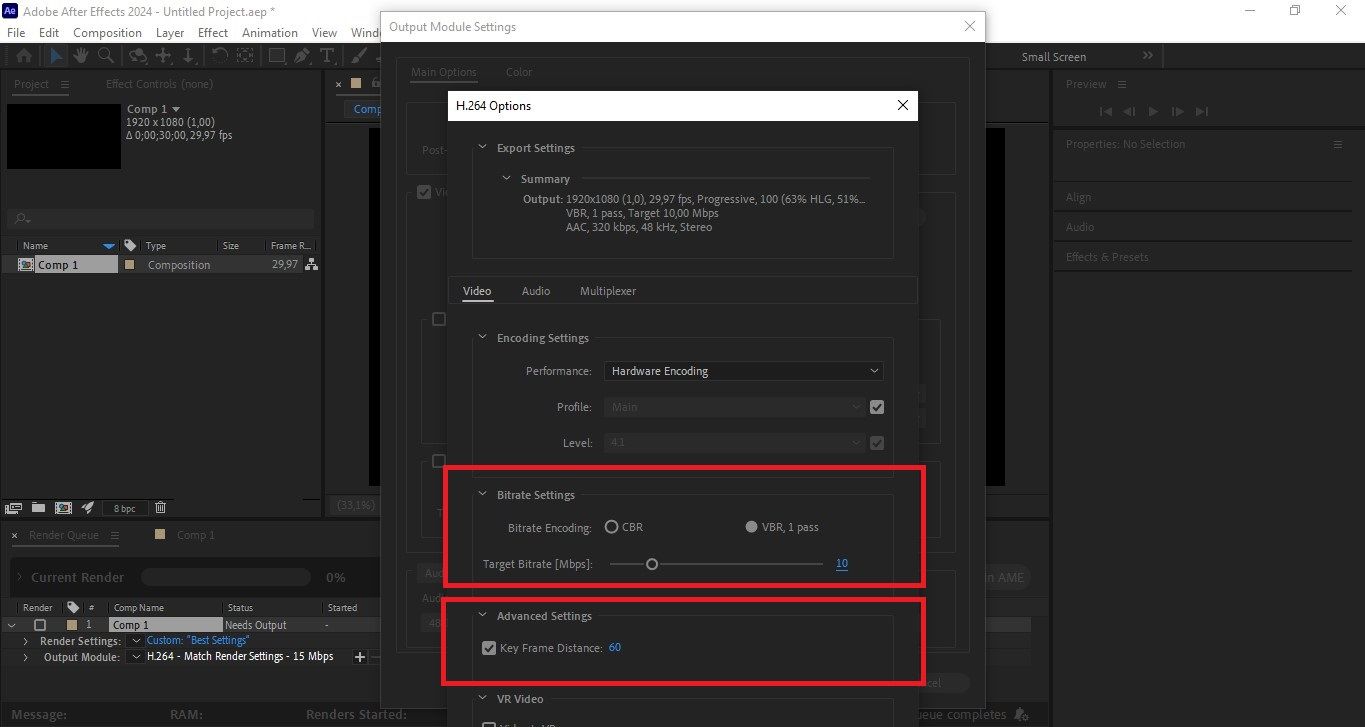
4. Keyframe Distance
Keyframe Distance regulates how often the video has keyframes. Render Queue > Output Module > Format: H.264 > Bitrate Settings > Keyframe Distance. A general practice is to keyframe every two seconds of video; so if the video is 30 fps, choose 60.
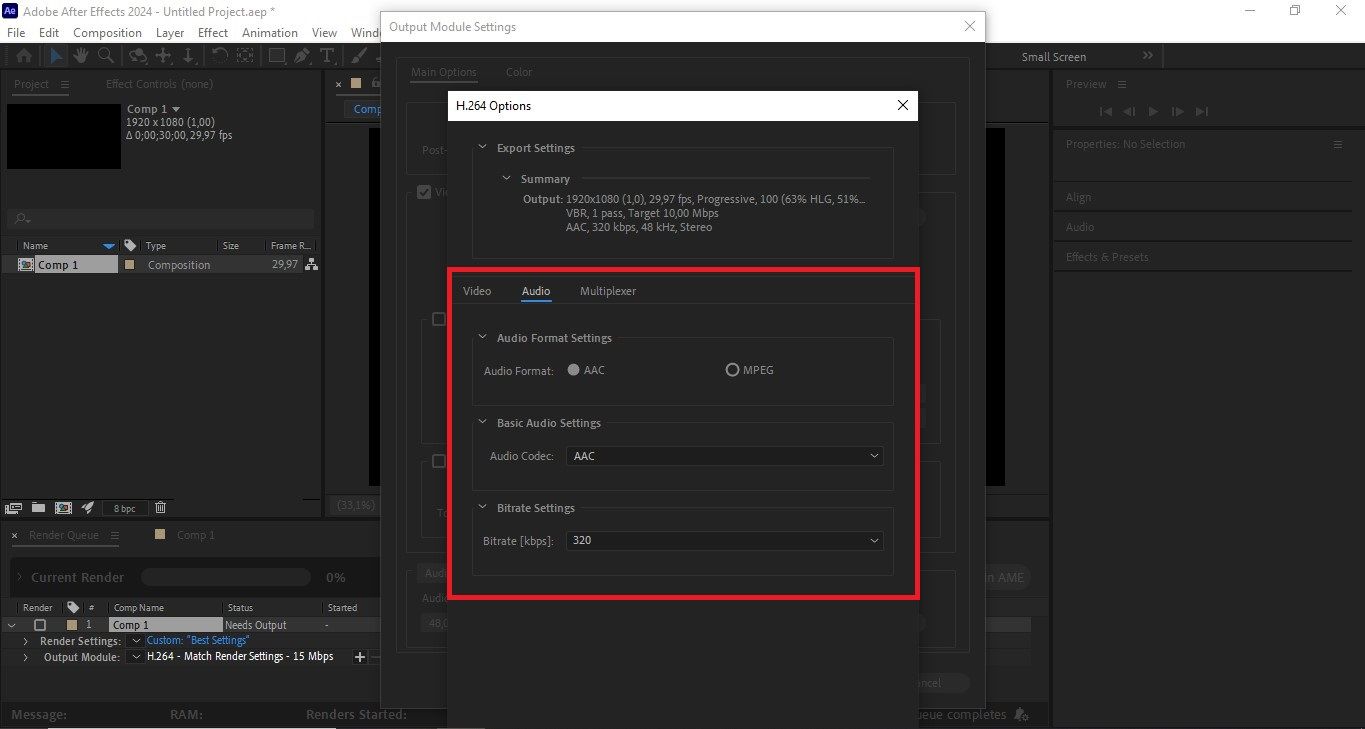
5. Audio
Optimal audio settings: Render Queue > Output Module > Audio Output/Audio > Audio Codec > AAC > Sample Rate > 48 kHz > Bitrate > 320 kbps > Channels > Stereo
6. Maximum Render Quality and Maximum Bit Depth
If you want to modify your video’s quality, jump over to the Render Queue. Render Settings, then switch on “Use Maximum Render Quality” and “Use Maximum Bit Depth.” Pushing Maximum Render Quality does make a difference, especially if you’re scaling your footage. Everything ends up looking sharper and just better overall.
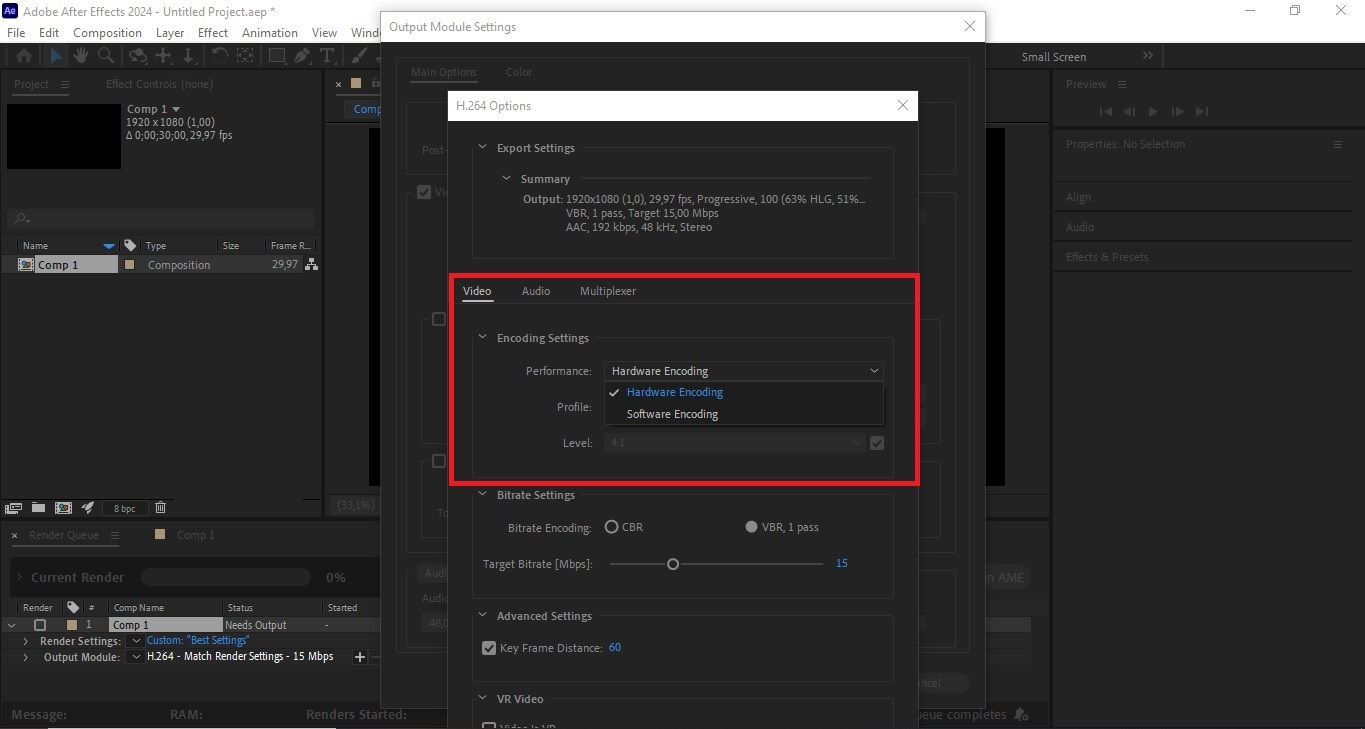
7. Hardware Encoding
Hardware Encoding affects how a video file uses the processor and graphics card when encoding. Render Queue > Format > Hardware Encoding. Use it if you have a new graphics card and want faster export. Avoid if you need visually complex projects and when you want maximum control over quality.
To conclude
Exporting MP4 from After Effects is pretty simple. You just stay in one program, follow a couple of steps, and you’re done. But here’s the thing - there’s not much room to tweak quality or compression, and bigger projects tend to export slower.
Professional tip:
Use Nexrender to automate rendering and exporting multiple videos in After Effects. Reduce the possibility of errors during repetitive tasks in AE.
Method B: Export MP4 with Adobe Media Encoder
1. Send composition to AME and keep working in After Effects
Go to the Control panel or Timeline > Composition > Add to Adobe Media Encoder Queue. In Media Encoder, choose MP4 by setting Format to H.264. For Preset, go to Export Settings and adjust bitrate, keyframes, and audio. Hit the green ‘Start Queue’ button. Once it’s done, you’ll find your MP4 file in the location listed under Output File.
2. Presets overview
Queue > Preset: Click on the blue text next to the composition. Match Source > High Bitrate - for a good balance of quality and file size; YouTube preset - uses recommended bitrates and format; Vimeo preset - better preserves details and gradients; Instagram Preset - adapted to vertical and square formats.
3. Customize: Profile/Level, VBR vs CBR, 1-pass vs 2-pass, keyframe interval
You’ll set up Profile/Level, VBR or CBR, 1-pass or 2-pass, and the keyframe interval just like you would in After Effects. But with Media Encoder, you get more options, better stability, and it’s just easier to make different versions of your video.
4. Bitrate ranges by resolution
Bitrate directly affects image quality and MP4 file size. For 720p - target bitrate is 4-6 Mbps; for 1080p - 8-12 Mbps; 1440p - 16-24 Mbps; and for 4K - 35-45 Mbps.
5. Audio settings
Preset > Export Settings > Audio > ACC > MP4 > Sample Rate > 48 kHz > Audio Bitrate > 320 kbps. Stereo is the standard for most videos, while mono is useful for voice-overs, podcasts, and interviews.
6. Hardware Encoding and fallback to Software
Go to Preset > Export Settings > Video, and look for Encoding Settings. Here, you’ll see options for Hardware Encoding and Software Encoding.
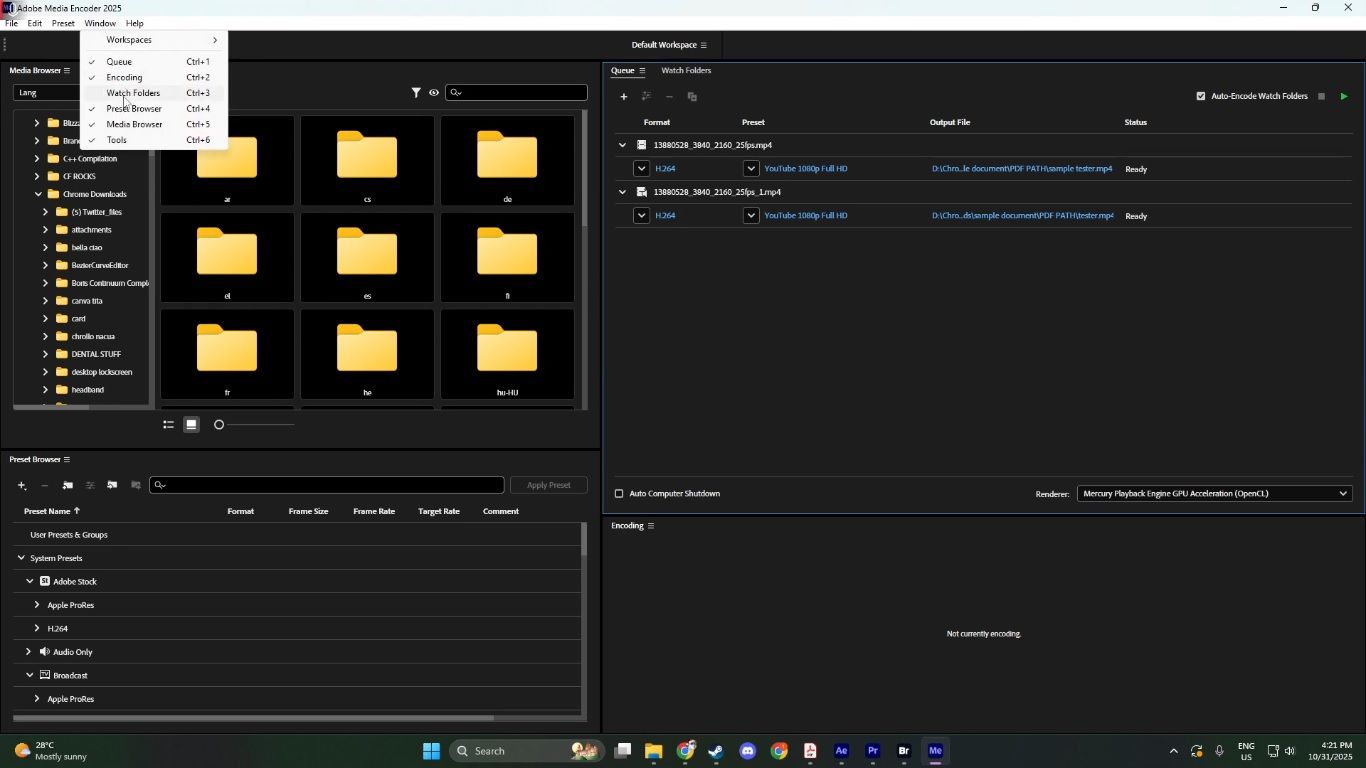
7. Queuing multiple comps and watch folder workflows
In After Effects, you can drop in a single composition or select a bunch from the Project Panel all at once. Want Media Encoder to handle exports on its own? Set up a watch folder by opening Adobe Media Encoder, hitting the plus sign next to Watch Folders, and picking a folder on your computer. Assign a preset, and you’re good. Drop any new files into that folder, and Media Encoder grabs them and exports them for you, no extra steps.
To conclude
Adobe Media Encoder gives more options for video quality and a more stable workflow, allowing you to be working in After Effects while the video is being rendered. It also allows exporting multiple compositions at once and making different versions of the same video. However, it may be very complex for beginners, and the method does get a little bit extensive for smaller projects.
Professional tip:
Use Nexrender to speed up AE workflow and reduce rendering time. This allows for faster content delivery, with less pressure on the creative team.
FAQ
Why can’t I find MP4 in the After Effects export settings?
H.264 won’t pop up as an export option in After Effects’ Render Queue - it just isn’t there when you try to export. So, send your composition to Adobe Media Encoder instead. That’s where you can export it as an MP4.
Why is my MP4 export taking so long?
Exporting can take a long time because VBR 2-pass encoding and high bitrates require more processing power. This applies particularly to complex compositions that have a lot of effects. Also, if a software encoder is to be preferred over a hardware encoder, it will again be slower since the CPU is doing all the work while specialized chips would do a better job.
How do I reduce the MP4 file size without losing quality?
Choose VBR 2-pass for smoother quality, and adjust your target bitrate to match your video’s resolution and length. No need to mess with the resolution or frame rate - focus on the bitrate. Also, use Rec. 709 color space and AC 48 kHz, 192-320 kbps.