How to Automate Video Rendering in After Effects
Personalization has become an essential marketing method that businesses must implement in their current marketing activities. Consumers expect brands to recognize them by name while showing knowledge of their interests and providing location-based customized offers. A brand faces significant resource demands because it must modify all text, and image, and data content for every individual customer. After Effects allows users to create various video content by using one template, which requires only basic operational procedures to produce multiple versions.
Automated systems enable instant campaign launch and prevent human mistakes while delivering consistent video quality across all content. Without automation, video marketing is only feasible for small projects, whereas automation enables scalability and cost-effectiveness.
In the following lines, we will present you with two methods of automatic video rendering. The first will rely on native AE settings, while the second will reveal a specialized automation tool.
How to Set Up Batch Rendering with After Effects Render Queue
1. Add compositions to Render Queue
Select composition and go to Composition > Add to Render Queue, or use shortcut ctrl/cmd + M to send it to Render Queue
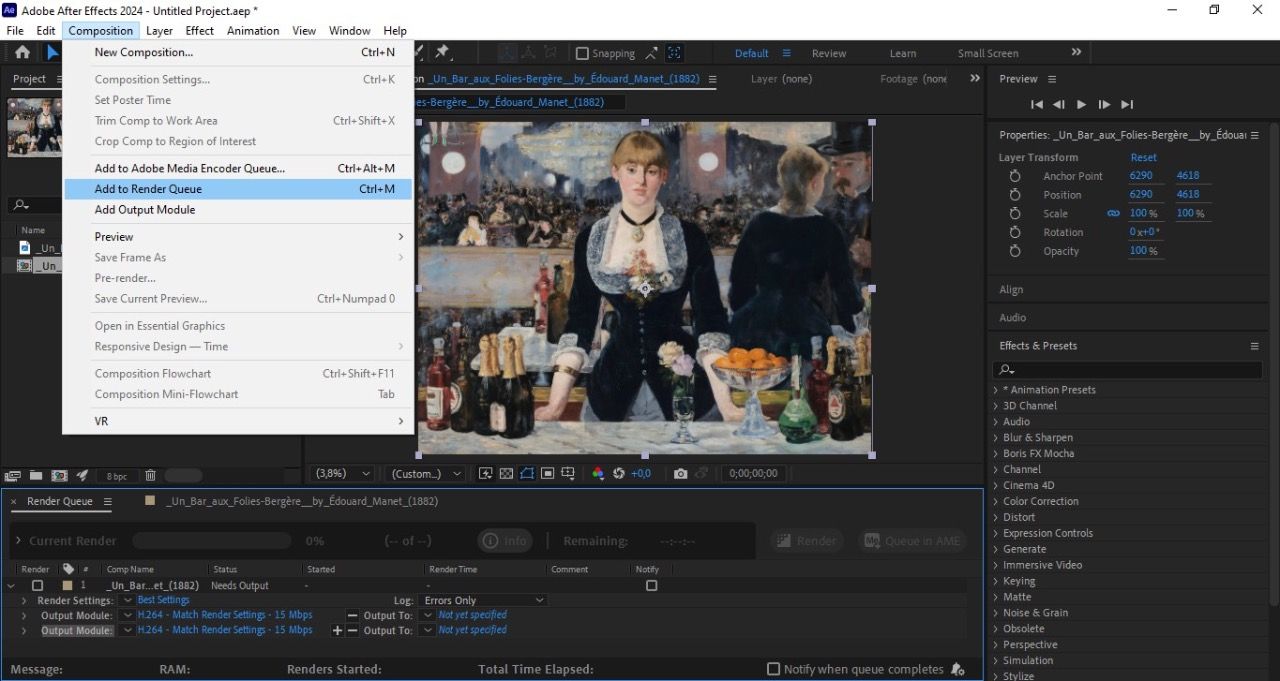
2. Adjust Render Settings
In Render Queue, click Render Settings and set Quality > Best; Resolution> Full - for final quality
3. Select Output Module
Click Output Module > select video format. H.264 for web or QuickTime for high-quality master file.
4. Set Output to location
In the Output To field, choose where to save the file and what it will be called, to avoid overwriting files.
5. Add multiple compositions to the same list
Repeat the same process for all compositions you want. They will all appear in the Render Queue list.
6. Run Batch Render
When everything is ready, click the Render button, and After Effects will automatically render all compositions in order.
Use Output Module Templates to save time
You can save your settings as an Output Module Template and use them for all videos, without resetting them. This is the best solution when you have multiple pre-prepared videos. For example, if you want to render different shots of the same campaign that have different scenes, formats, or languages. However, this approach does not change names, prices, and other data automatically. This strategy requires more advanced automation methods.
How to Automate After Effects rendering with Nexrender
Nexrender is a tool that enables fully automated rendering of video content from After Effects templates, without manually opening and adjusting compositions. With Nexrender, you can quickly generate a large number of video versions, replacing text, images, and other elements based on predefined data.
1. Prepare After Effects templates for automation
Before using Nexrender, the composition must be made to support changes. This means that text, images, video, and colors should be clearly separated and ready for dynamic changes.
2. Use controlled layers in After Effects
The text you want to change must be a regular Text Layer, and the materials must be Footage Layers. If the text has been converted to Shape or the elements are pre-rendered, Nexrender will not be able to recognize and replace them.
3. Organize the project
It's important that layers have clear names, such as product_image or story_value. This makes swapping assets a whole lot easier later. You’ll immediately see which layer does what, instead of clicking around and trying to figure it out. When everything’s clearly labeled, there’s no second-guessing during setup - and that means fewer mistakes and way less wasted time.
4. Log in to Nexrender
Start by signing in to your Nexrender account. If you don’t have a Nexrender account yet, you can request a free trial at the Nexrender website.
5. Upload your After Effects template to Nexrender
In the Dashboard, upload your After Effects project file and custom fonts. The template can be:
- .aep
- .mogrt
- .zip (with assets included)
The uploaded file becomes the base template used to generate all future versions. It should be prepared in advance with clearly structured compositions and properly named layers to ensure accurate dynamic replacement during rendering.
6. Define which layers will be dynamic
Each render is defined in Nexrender JSON configuration, which specifies: path to .aep file; name of the composition to be rendered; output format, and file location. This can be done through an easy-to-use dashboard
Automatic text replacement
Through JSON configuration, you can define that a specific text layer should be replaced with new values. For example, the user name is automatically changed for each render, without any manual intervention in After Effects. This is the basis of personalized marketing.
Automatic image and video replacement
Nexrender allows images and videos to be automatically inserted into templates. This means that each user can get a different product image, banner, or video, while the design remains the same. This way, the AE template remains the same, only the assets change.
Support for CSV, JSON, and API data
Data can come from CSV files, JSON files, and external APIs, which allows for mass rendering of personalized videos.
7. Render a lot of videos without manual work
Once everything is set up, Nexrender can automatically render hundreds or thousands of videos. No opening After Effects, no clicking, no manual editing - everything happens automatically.
8. Set output formats
The final video format is controlled through the After Effects output Module and Nexrender settings. You can use H.264 for web and social media, ProRes for master files, and custom presets for specific needs. All versions can be rendered automatically.
Automatic launch and scaling
Nexrender can be used locally, on servers, or in a Cloud environment. This means that the system can grow with the campaign, from tens to tens of thousands of videos. This is why Necrender is often the choice for serious, personalized marketing campaigns.
Post-Render Automation
How Watch Folder Automation Works
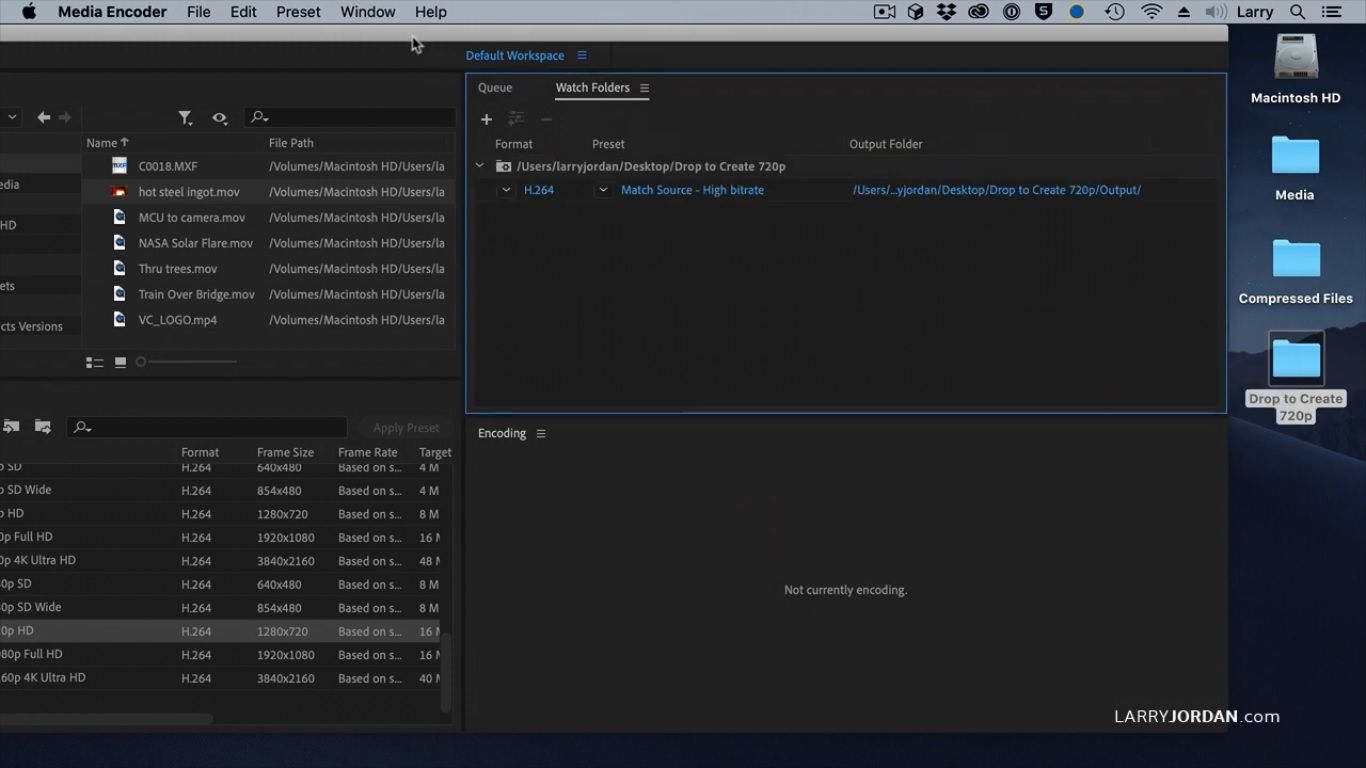
The rendering process in After Effects lets users automate subsequent tasks once rendering is complete. The Watch Folder option in Adobe Media Encoder is the most popular method for processing media files. Media Encoder automatically detects new rendered video files in the folder and adds them to the processing queue for further work. The process uses scripts or automation tools to create files, which they then store in that directory. Media Encoder can perform tasks after the user completes their actions by changing file formats, preparing files, and making expressions. The process enables automatic render monitoring, which boosts production speed by eliminating manual work.
Video automation and distribution through integrations
You can use multiple integrations to automate your current process. Services like Zapier allow you to connect Nexrender or other tools to platforms without the need for programming. The system enables the automatic execution of specific tasks that activate after rendering completes. Users can automatically transfer completed video files to Google Drive and Dropbox, along with other file storage services. Users can use integrations to distribute their videos automatically to social media platforms and their internal networks.
Using APIs, it is possible to build more advanced and customized workflows that connect data entry, rendering, and delivery of final videos. This approach is particularly suitable for creating end-to-end workflows, where the entire process takes place automatically - from the initial data entry to the final video delivery.