How to Create 3D Animation in After Effects
How 3D Works in After Effects
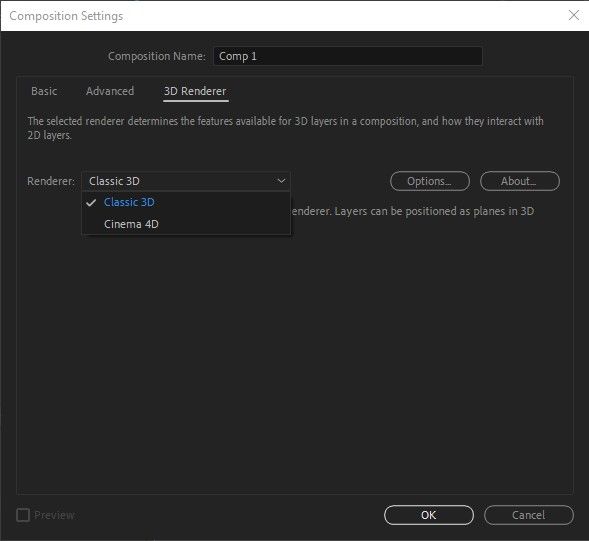
Classic 3D vs Cinema 4D Renderer
After Effects has two main systems for 3D rendering, Classic 3D and Cinema 4D render. Both are indeed useful, but they are not operations in the same way, and one can have its own set of distinct advantages.
Classic 3D - for fast, simple 3D animations, such as TV graphics, subtitles, and motion design
What it supports:
- Any 2D layer, such as images, text, or video, can be converted into a 3D layer - it can be moved in depth, back and forth.
- Layers can be rotated in the X, Y, Z axes
- You can add lights that affect the illumination of layers
- Layers can cast and receive shadows
- You can add a camera that moves through the scene, creating a sense of depth
Common limitations:
- Layers are always flat plates; they cannot become real 3D objects
- No extrusion: text and shapes cannot get depth
- Lights and shadows are simple and not photorealistic
- Depth in field exists, but it is quite basic and less convincing
Cinema 4D renderer - when you need 3D typology or simple 3D objects with depth, but without going into complex 3D software
What it supports:
- Shape extrusion - letters and shapes can be given the right thickness; they become solids, not plates
- Objects have volume and behave realistically in space
- Lighting looks more natural than in Classic 3D mode
- Blurring of foreground and background looks more convincing
Common limitations:
- Cannot be used with standard 3D options
- Many popular AE effects do not work in this mode
- Slower performance and rendering
- Cannot be compared to real Cinema 4D software
Professional tip:
Use Nexrender to automate the creation of videos with 3D effects and animations in After Effects. It’s also great for managing lots of similar videos that swap out text, images, or data. No need to open each project one by one.
Types of 3D content in After Effects
You can import 3D objects in After Effects from three main sources, each with its advantages. First, the native ones - conventional items like text, shapes, or images that you can switch into 3D layers. It’s simple and works for quick projects, but you don’t get true depth or detailed geometry. Then there’s Cineware, which lets you pull in real 3D models made in Cinema 4D Lite. Here, you actually get depth, proper materials, and real lighting, so things start to look much more realistic. And finally, there are third-party plugins, which open up even more options, but that’s a story for another time. These models are then combined with animation and effects in After Effects.
The third approach is represented by third-party plugins that introduce their own 3D systems directly into AE. Thus, they offer greater flexibility and faster work with 3D models than built-in solutions. However, this requires additional cost and learning new tools.
When to use which path
Native 3D is for beginners in After Effects 3D animation, working with simple scenes with basic visual quality. You can get these quick animations running very fast on even a low-end computer. If you have a little more time and want something a bit more realistic, by all means, use Cineware for the slightly more tedious projects. This software can run stably with moderate scenes and on not-so-powerful computers. For complex scenes, you still need plugins, especially when a visual wow effect is important. Plugins offer the most options, but also require the most time to learn and test. They require a powerful graphics card.
Professional Tip:
Nexrender is your shortcut to automated rendering! It helps to create a large number of videos with different texts, images or data, without carrying out each project individually.
How to Create 3D Animation in After Effects (Core Workflow)
Preparation, creation of 3D elements, and selection of renders
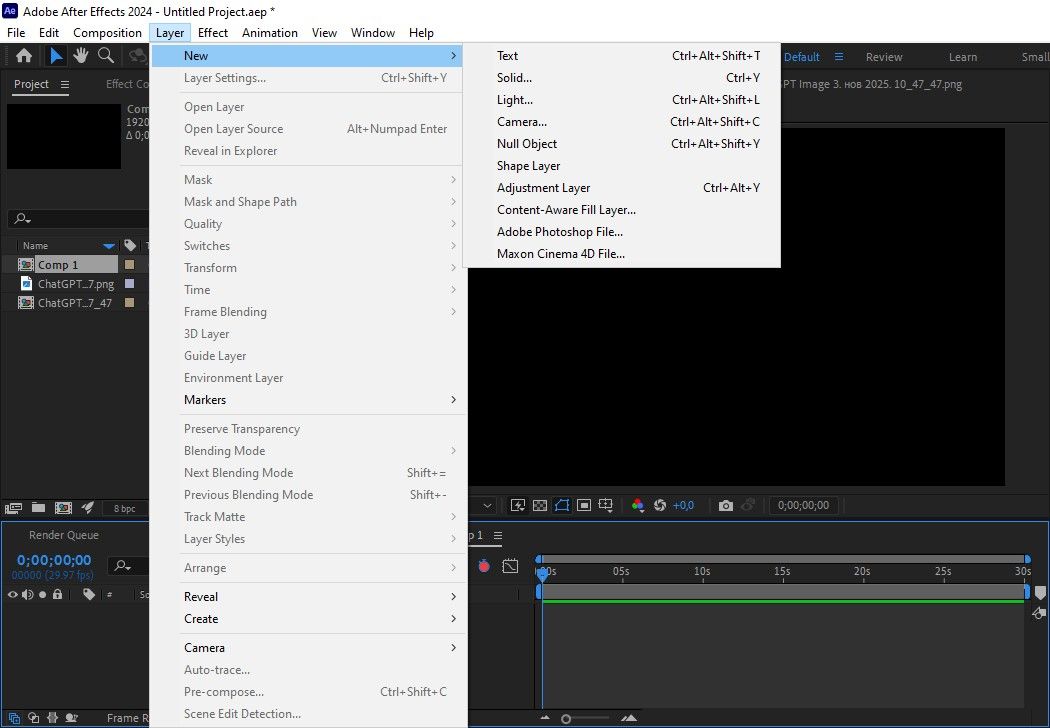
The initial step towards doing anything in the After Effects 3D animation area is to set up the compositional selections. The setting of size, the picking of duration, and colors - just get the canvas ready and then start. After that, you make your 3D text or shapes and pick the renderer you want to work with. That’s what decides how your 3D elements actually look and act. After that, you turn your text or shape into a real 3D object, tweak the depth and edges, and suddenly it all has some real volume and life.
Camera and spatial sense settings
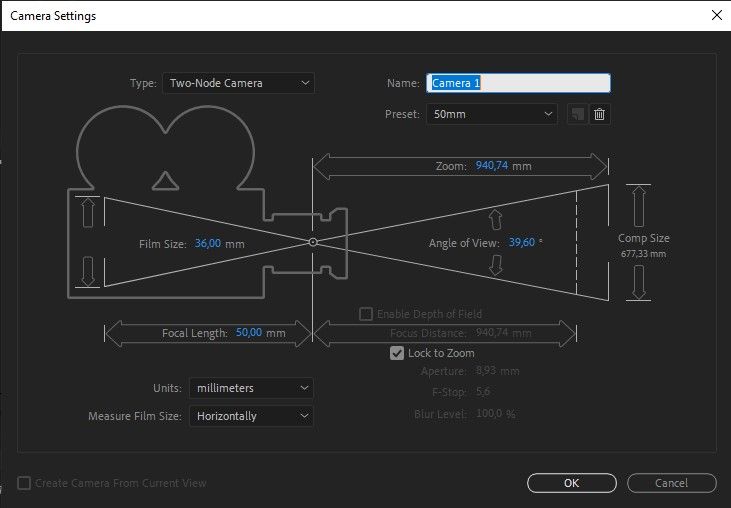
The basic material settings then determine how the surfaces react to light, affecting the shine, reflections, and overall character of the object. A camera is added to allow movement through 3D space and establish the relationship between the foreground and background. The camera is connected to a null object, making it easier to control the movement. This further results in subtle parallax effects during animation. Different types of camera rigs are used to move the camera more precisely. This includes circling the object, zooming in, or focusing on a specific point.
Realism: lighting, depth of field, and motion blur
Then you need to place lights to emphasize the depth of the scene and clearly separate the main elements from the background. Picking between point, spot, and ambient lights - and how you handle shadows - really shapes how your 3D After Effects scene looks and feels.
Want your animation to look more real? Try adding depth of field and motion blur. These effects will give a sense of realism to your work, as if it was really taken with a proper camera. With depth of field, the artist can choose what stays sharp and what is slowly blurred away, thus guiding the viewer's attention exactly where it desires. Motion blur templates the same sense of smoothness to any fast motion - be it a layer or the entire scene - making it natural and relaxed, instead of stiffened. It is for sure the easiest way to make your visuals look professional and more polished.
The final animation tweak
Finally, you need to adjust the pace of the animation by smoothing keyframes and precisely shaping the curves of the movements. If you use a slight overshoot of the movement and the shifted timing between elements, your animation will have a more natural and fluid look.
Professional tip:
Automated rendering through Nexrender enables more precise scheduling of deadlines, as processes can be scheduled and executed without manual intervention.
FAQs
Can After Effects replace full 3D software?
After Effects isn’t built to fully replace real 3D software. It just doesn’t have the advanced modeling tools or the kind of detailed control you need for complex simulations and geometry. 3D in After Effects is pretty solid for basic and intermediate work with motion graphics, 3D text, or simple scenes. Practically everybody uses it alongside their proper 3D applications rather than instead of.
What is the best way to get soft shadows and realistic reflections?
Instead of depending on a bright source of light, combining different light sources that appear right with moderate material settings will allow the shadows to appear somewhat diffuse. A realistic result is also achieved by using reflective surfaces with controlled roughness and an environment that has enough visual elements for reflections to be visible at all.
Why does my 3D animation look flat?
The animation feels flat because everything blends together - foreground, middle, and background. The camera and lights don’t help much either, since they don’t create any real sense of space. Without good lighting, shadows, or interesting camera movement, the whole scene just ends up looking two-dimensional, even though it’s supposed to be 3D.